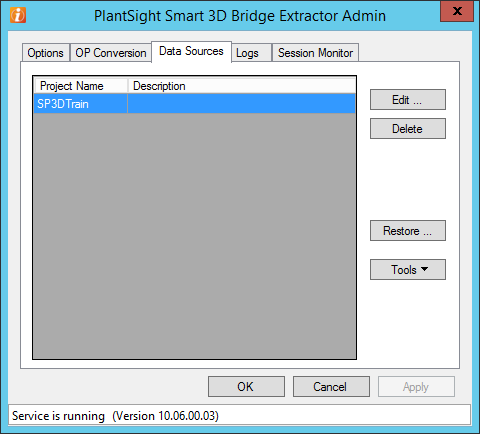
| Tools
|
The
Tools button provides access to
Create Report Database and
Edit Reference3D Models functionality.
|
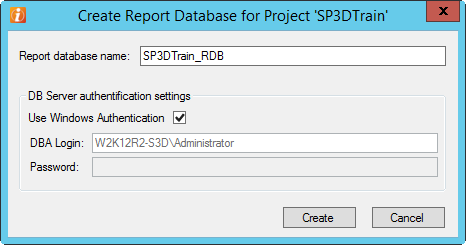
| Create report database for standalone project
|
Some S3D filters require Report database for execution. If you do
not have Reports database created, then such a filters will not be visible in
the filters tree when you select filter for export.
To create a report database for a standalone
project, highlight your project in
Standalone Projects list, click
Tools button, then select
Create Report Database item from drop-down
list. The Create Report Database dialog opens.
- Report
database name - Specifies a name for the database to be created and
database server authentication properties. A report database will be created on
the same DB server where Model database resides.
Database users must have a
Database Administrator role on
database server.
If a database with the same name already
exists, you'll see a warning message. If you agree to create a new database
with the same name, then old database will be removed.
Click
OK and wait while the database is
being created. When the project is restored you get the following message:
"Report database for project <project
name> was successfully created:"
|
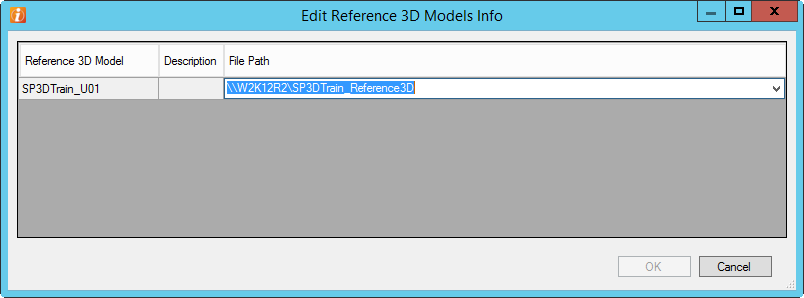
| Edit path to Reference3D Models for standalone
project
|
If standalone project has Reference 3D models
attached, it is necessary to give
PlantSight Smart 3D Bridge Extractor possibility to access these Reference 3D model files (with
.zvf extension).
After project restoring users must copy model files
(keeping folder structure) to service machine or give access to shared folders
with these files.
The Edit Reference3D Model Info dialog allows user
to set actual path to Reference 3D model files.
Highlight your project in
Standalone Projects list, click
Tools button, then select
Edit Reference3D Models... item from
drop-down list. The Edit Reference3D Model Info dialog opens.
The dialog lists all Reference3D models in
standalone projects. You can modify File Path for desired 3D models.
|
| Restore (standalone project)
|
To restore standalone project from S3D backup you
need to click the
Restore button and specify required data in
Restore Project dialog.
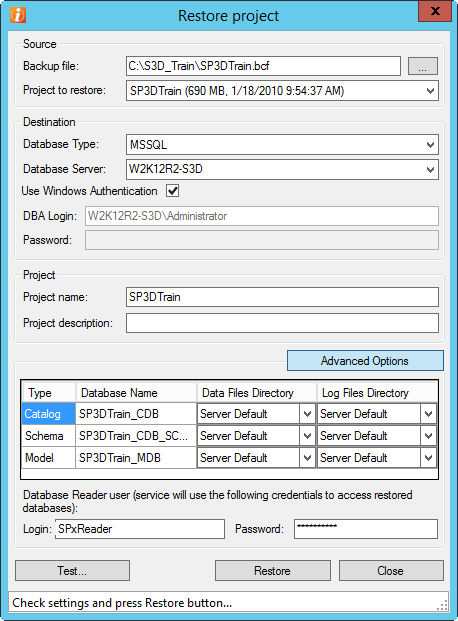
- Specify backup and
project to be restored.
- In the
Source section click the
... button to select a S3D backup
file with a
.bcf extension;
- Select project
to be restored from the
Project to restore drop-down list.
- Specify destination
where your project is going to be restored.
- Select database
server type from
Database Type drop-down list;
- Specify database
server name in
Database Server field (you can put
the name manually or select from the list);
- Specify the user
that will be used for database restoration. This user must have a
Database Administrator role on the
database server.
For Oracle: The DBA role is added by
executing a command
ALTER USER "<username>" DEFAULT ROLE
"DBA"
If you are going to use Windows
authentication then set the
Use windows authentication. The
fields
User and
Password become read only and are
filled with current logged Windows account automatically.
If you want to use your SQL server authentication then
uncheck
Use windows authentications and
specify user name and password.
- Specify project
settings:
- In the
Settings section, fill in the
Project name field;
Project Name is required and must be
unique along all standalone projects.
- Describe your
project in
Project description field or leave
this field empty;
- To specify Advanced
Options, press the
Advanced Options button:
- The
New databases table contains the
list of 3 databases that will be created during project restoration -
Catalog database,
Schema database, and the
Model database. You can change their
names in the
Database Name column, the directory
to restore data files in the
Data Files Directory column, and the
directory to restore index and log files in the
Log Files Directory column.
- Restored
databases will be accessed from
PlantSight Smart 3D Bridge Extractor by default under special
Database Reader credentials.
You can specify Database Reader credentials
in the
Login and
Password fields. The default
login/password is
SPxReader / Reader$814.
If the specified login is not exists on
database server, it will be created with read-only access to restored
databases.
Later you can change your login/password
for access to databases in the Edit Standalone Project Definition dialog.
- Click the
Restore button.
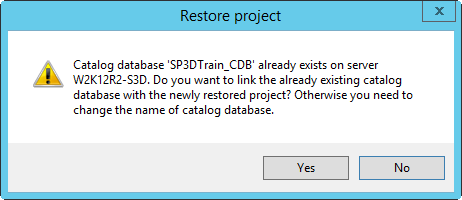
If a catalog database already exists on the
selected database server then you will get the following message:
Click
Yes if you agree to use the existing
catalog database or, if you disagree, click
No and change the catalog database
name in the
Database Name column in
Advanced Options section.
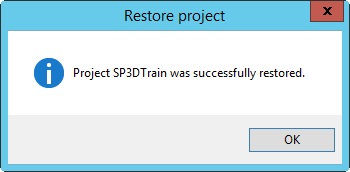
When project is restored you get the following
message:
The name and description of your project appears in
the list of restored projects in
Standalone Projects table.
|
| Delete (remove standalone project)
|
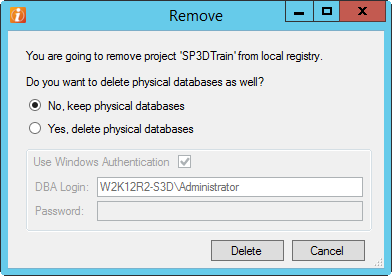
To remove project from the Standalone Projects list
highlight the project and click the
Delete button. The following dialog appears:
- No, keep
physical databases - Select if you want to just remove project
record from the list of standalone projects and keep all databases related to
specified project on database server.
- Yes,
delete physical databases - Select if you want to remove all
databases related to specified project from database server as well. In this
case you must specify DBA credentials to access database server.
|
| Edit (standalone project properties)
|
To check/update project properties highlight your
project in
Standalone Projects list and press the
Edit button.
There are some details on what can be changed in
Edit Standalone Project Definition dialog:
- Project
Name - The name of project. It is editable. This is required field,
so you can't leave this field empty. The
Project Name must be unique along all
other standalone projects.
- Description -
Project description. Editable. Not required.
- Database
Provider - Database server type for project: MS SQL or Oracle.
- Disabled -
Disable project: keep it in the
Standalone Projects list, but do not
expose to client applications.
Database connectivity details can be reviewed for
all 3 or 4 project databases.
|